With cloud storage becoming more essential than ever, many users are looking to move their photo libraries from Dropbox to Google Photos—for better organization, sharing, or simply to save space. But what’s the easiest way to do it without spending a dime? In this article, we’ll explore the top 4 free methods to transfer your photos from Dropbox to Google Photos, including both manual and fully automated options. Whether you’re a beginner or just want the most efficient solution, we’ve got you covered.
Why Transfer Photos?
Before diving into the methods, it’s important to understand why you might want to move your photos from Dropbox to Google Photos:
Storage Optimization: Dropbox’s free plan only offers 2GB of storage, which can quickly fill up, and upgrading can be costly. In contrast, Google Photos provides 15GB of free storage (shared across Gmail and Google Drive). With the “Storage saver” mode, photos and videos are lightly compressed to save space. Although uploads after June 1, 2021, count against your storage quota, Google’s compression technology still offers efficient storage management. Overall, Google Photos is a more professional and cost-effective solution for managing photos.
Feature Differences & Smarter Photo Management: Thanks to its advanced AI capabilities, Google Photos excels at organizing and managing images. It can automatically group photos by date or event and offers powerful search features—letting you find images using keywords, facial recognition, or even location data. While Dropbox is excellent for file syncing and sharing, it lacks these photo-specific tools, making Google Photos the better choice for users who want smarter photo organization and retrieval.
Ecosystem Integration & Convenience: For Android users or those who rely heavily on Google’s ecosystem (like Gmail, Google Drive, and Google Calendar), switching to Google Photos can greatly enhance the overall experience. Photos can sync seamlessly with your phone’s gallery and integrate with other Google services for easy cross-device access and management. In comparison, Dropbox, as a standalone platform, offers less integration with Google’s tools.
Method 1: Direct Download & Upload (For a Small Number of Photos)
Suitable Scenario: This method is ideal for users with a small number of photos (e.g., fewer than 100) and who don’t need frequent transfers. It’s perfect for quickly moving a small batch of photos.
Steps:
Download from Dropbox:
Web Version: Log into Dropbox → Select photos → Click “Download” (they will be automatically packaged into a ZIP file).
Mobile Version: Open the Dropbox App → Long press on the photo → Tap “...” → Select “Export” to the local gallery.
Upload to Google Photos:
Web Version: Go to photos.google.com → Click “Upload” → Select the extracted photos.
Mobile Version: Open the Google Photos App → Tap “+” → “Upload” → Select files from the local gallery.
Advantages:
No need to install additional tools or third-party software; the process can be completed using just a browser or existing apps, making it simple and intuitive.
Suitable for users with little technical knowledge, as the steps are easy to understand and follow.
Disadvantages:
When dealing with a large number of photos, the download and upload process can be time-consuming and inefficient.
Requires more manual intervention, and with a large number of files, there is a higher chance of missing or duplicating items.
Method 2: The Fastest Way to Transfer Photos from Dropbox to Google Photos (RiceDrive)
Suitable Scenario: This method is ideal for users who want a fully automated solution, especially beginners or those needing to transfer large batches of photos. It eliminates the need for manual downloads and uploads, significantly improving transfer efficiency.
Steps:
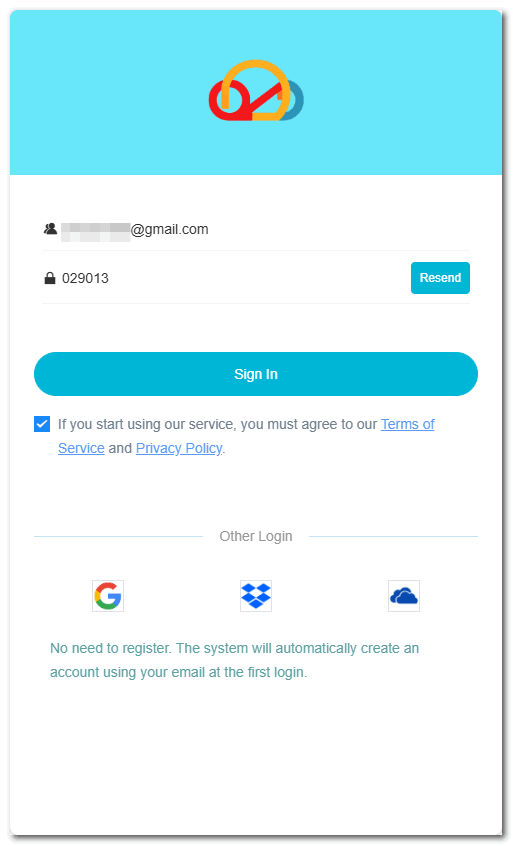
Log into RiceDrive
Open your browser and visit the official RiceDrive website (www.ricedrive.com). You can quickly log in by receiving a verification code via email.
Connect Your Dropbox and Google Photos Accounts
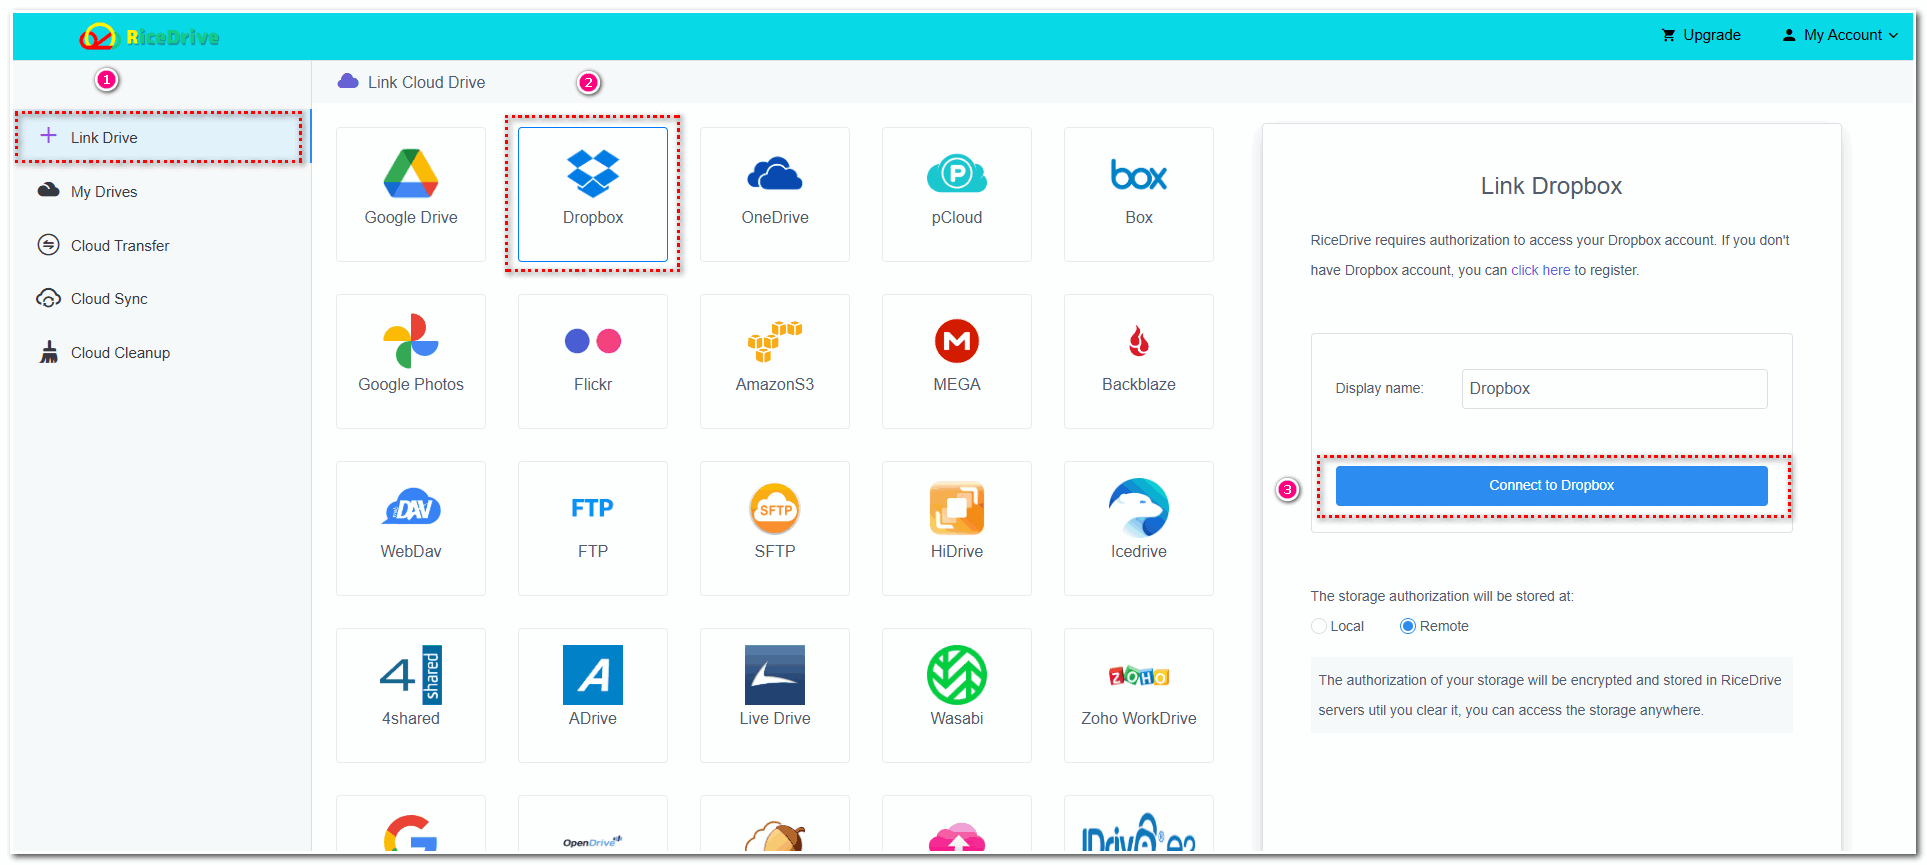
On the RiceDrive dashboard, click the “Link Storage” button.
Select Dropbox as your cloud storage, click the connect button, and authorize RiceDrive to access your Dropbox account (authorization is required only once and is secure).
Similarly, connect your Google Photos account and authorize RiceDrive to access your Google account.
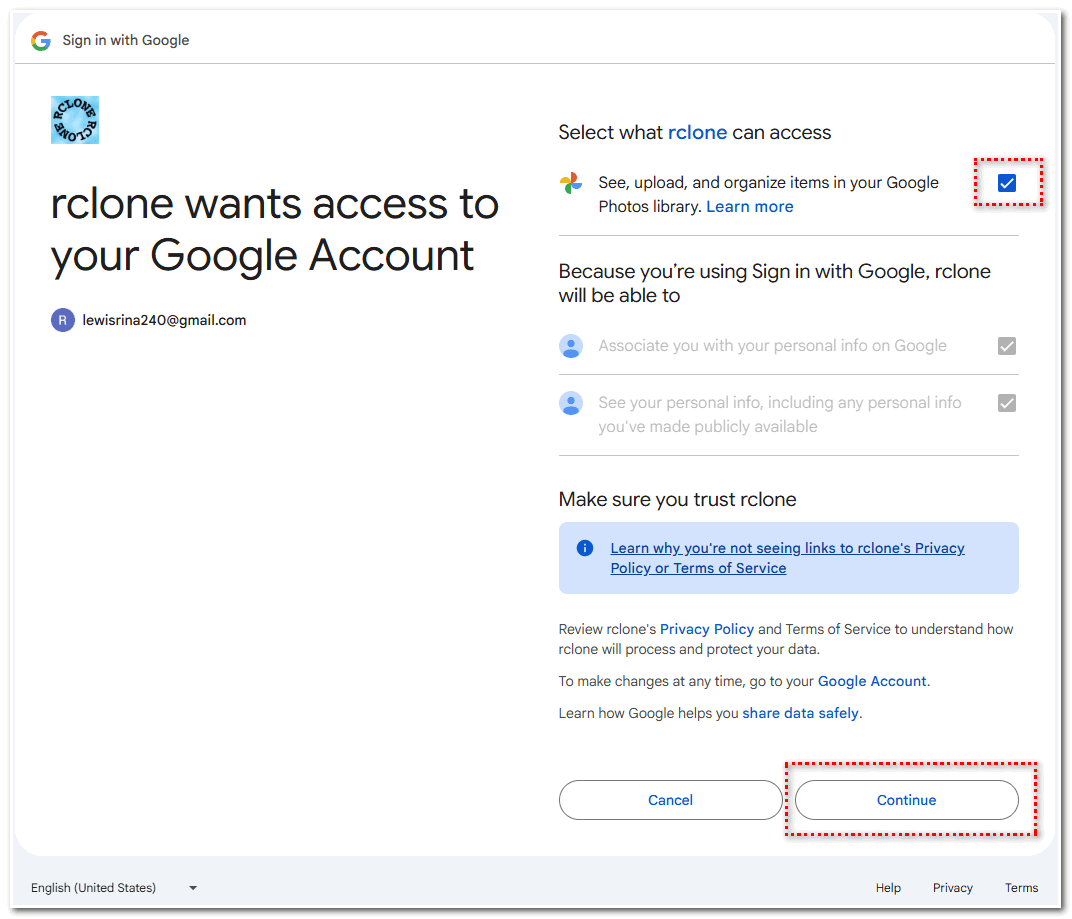
Note: When authorizing your Google account, make sure to check the checkbox and click the “Continue” button to grant RiceDrive access to your Google account.
Create a Transfer Task
Go to the “Cloud Transfer” page in RiceDrive.
Select Dropbox as the source and choose the photos or albums you want to migrate.
Select Google Photos as the destination, and you can further specify which folder in Google Photos you’d like the photos to be stored in. Here, we select the “Photos” folder.
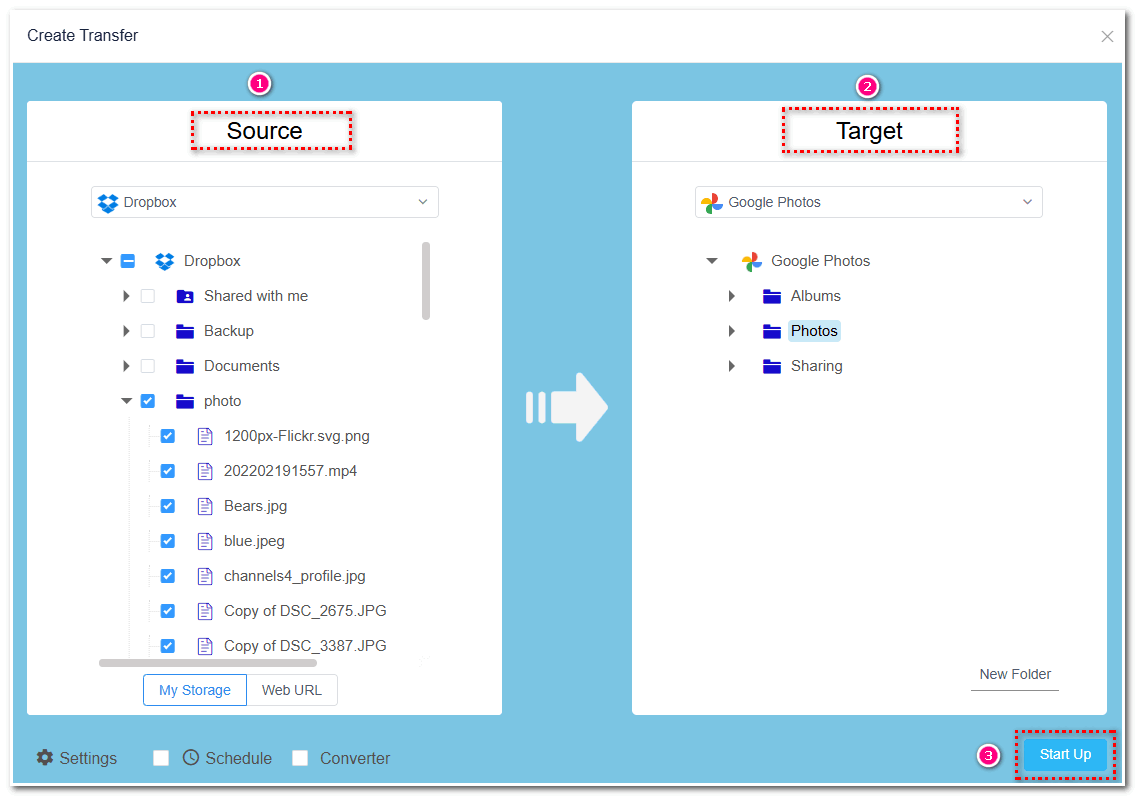
Start the Transfer
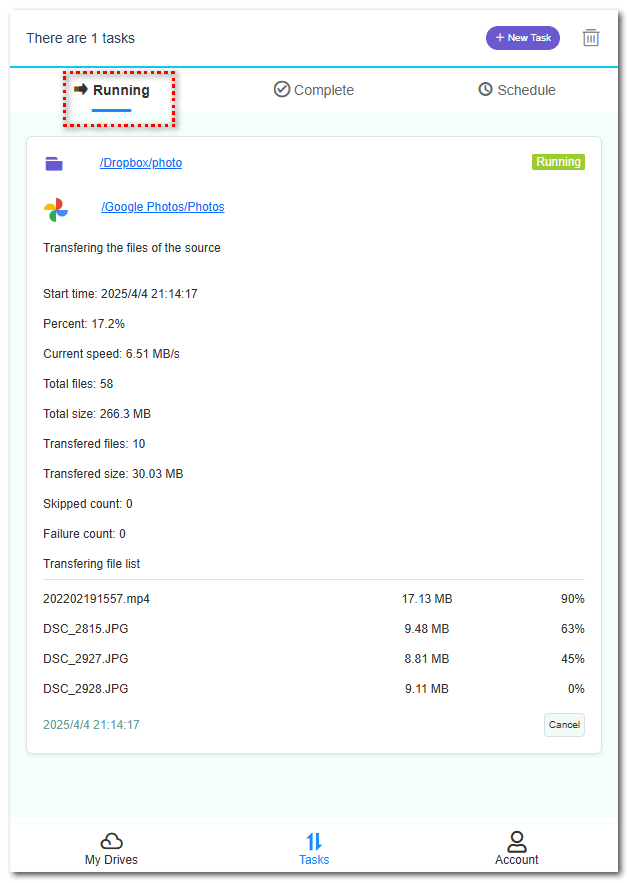
After configuring all the settings, click the “Start Up” button to begin the transfer task.
The transfer process will be completed automatically in the background, and you do not need to keep your computer or browser open. You can close RiceDrive and your computer. RiceDrive will continue to process the data migration on the server side.
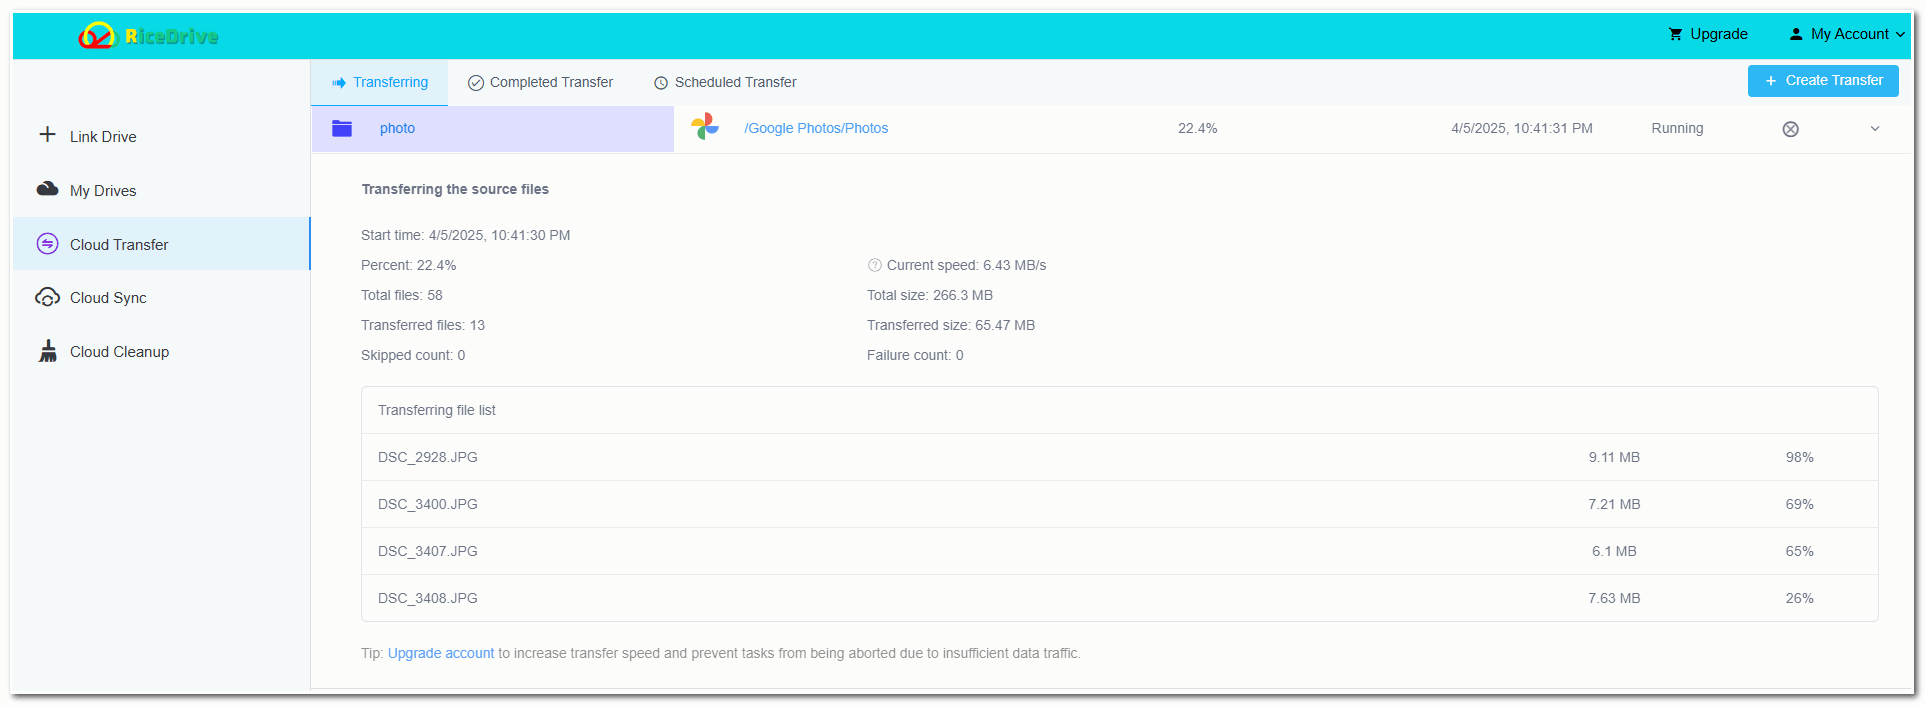
Monitor and Verify
You can log into RiceDrive at any time to check the transfer progress.
Once the transfer is complete, check Google Photos to ensure that all photos have been successfully migrated. RiceDrive also provides detailed transfer logs to help you verify the migration status of each file.
Advantages:
No need to download files locally; supports direct cloud-to-cloud transfer, which is faster and does not consume local hard drive or bandwidth resources.
Offers scheduled tasks, resume support, and file filtering (by format and size).
Disadvantages:
The free version has a monthly limit of 10GB for data transfer. Large file transfers require a paid upgrade.
Note: If you want to preserve the original creation dates and other metadata of your photos, it’s recommended to first transfer the photos from Dropbox to Google Drive using RiceDrive, and then import them into Google Photos from Google Drive.
This process will retain the original timestamp; otherwise, the photos will display the most recent upload time in Google Photos.
Method 3: Transfer Photos from Dropbox to Google Photos on iPhone
Suitable Scenario: This method is ideal for users who prefer to operate solely on their mobile devices, allowing them to efficiently transfer photos without the need to open a computer. It is perfect for users who need to manage their photos anytime, anywhere.
Steps:
Open the RiceDrive mobile app (https://mobile.ricedrive.com/) on your phone, enter your email address, and quickly log in by verifying the code sent to your email, or use a third-party service for fast login.
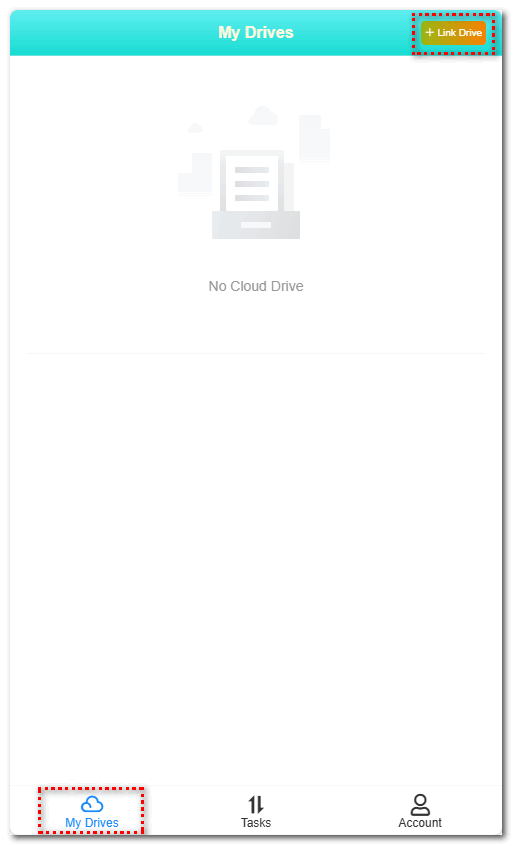
Go to the "My Drives" page and click the "Link Drive" button to enter the cloud storage add interface.
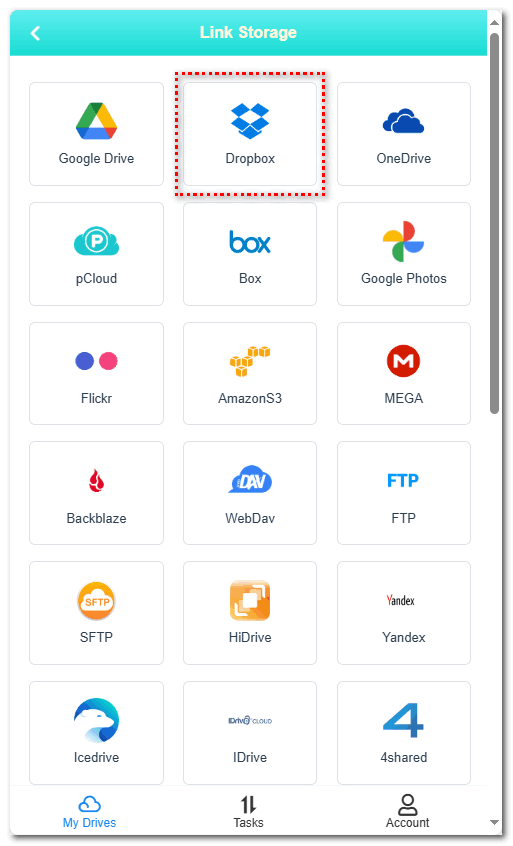
Click the Dropbox icon and follow the prompts to authorize RiceDrive to access your cloud storage account. This typically requires you to log in and grant RiceDrive the necessary permissions. Once Dropbox is successfully added, you will see it listed in your cloud storage accounts on the My Drives page.
Repeat the above steps to add your Google Photos cloud storage to RiceDrive, and make sure both cloud storage accounts are successfully added to RiceDrive.
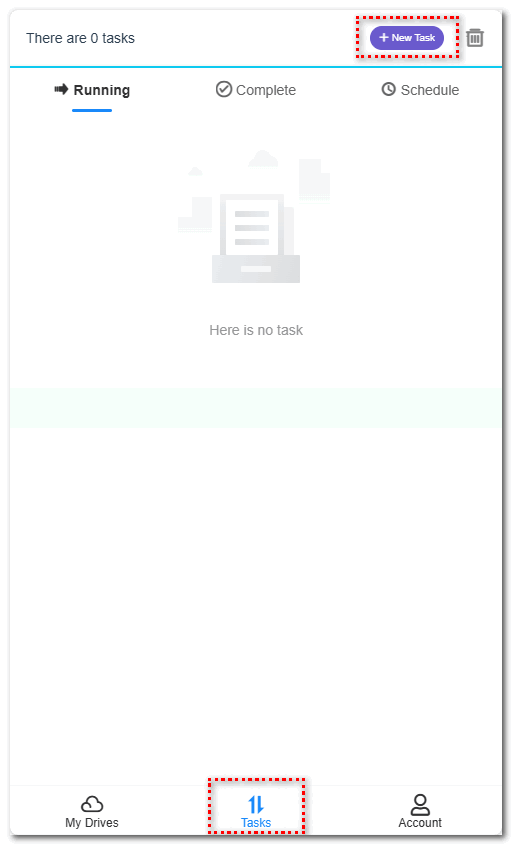
Create a transfer task from Dropbox to Google Photos by going to the Tasks page and clicking the New Task button to start the task creation process.
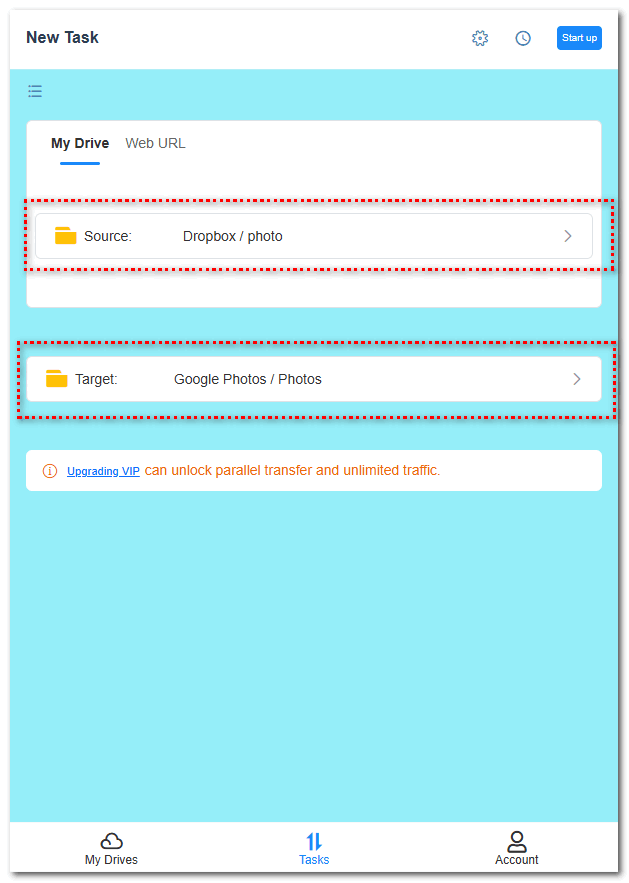
In the Source section, select the photos or album from Dropbox, and in the Target section, choose the Photos folder in Google Photos as the destination. You can also click the gear icon in the top-right corner to set file filters, schedule the task, and adjust other settings. Once everything is configured, click the "Start Up" button in the top-right corner to begin the transfer task.
During the task execution, you can close RiceDrive and attend to other important tasks. Once the transfer is complete, check the logs to verify that all files have been successfully transferred.
Note: After the photo transfer is complete, the original album in Dropbox will not be deleted. If you wish to delete it, please ensure that all photos have been successfully transferred before manually removing it.
Method 4: Use Rclone for Data Migration (For Windows Platform)
Suitable Scenario: This method is ideal for users on the Windows system, especially those who want to perform cloud data migration for free. Rclone is a powerful, fully free, open-source command-line tool that supports various popular cloud storage services (such as Google Drive, OneDrive, Dropbox, etc.), making it perfect for technical users to handle large-scale data migration tasks.
Steps:
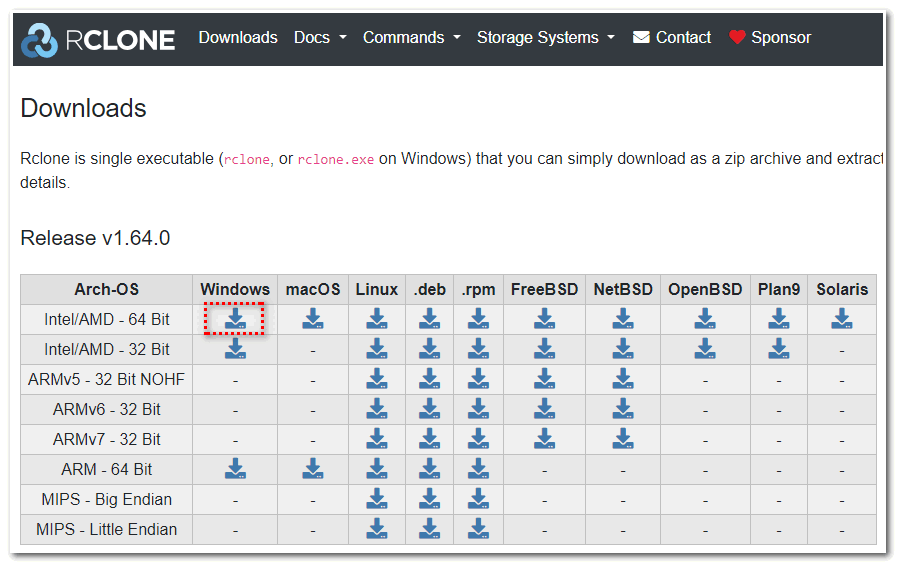
Download the Rclone command-line tool from the official website: https://rclone.org/downloads/. Then, extract the downloaded ZIP file.
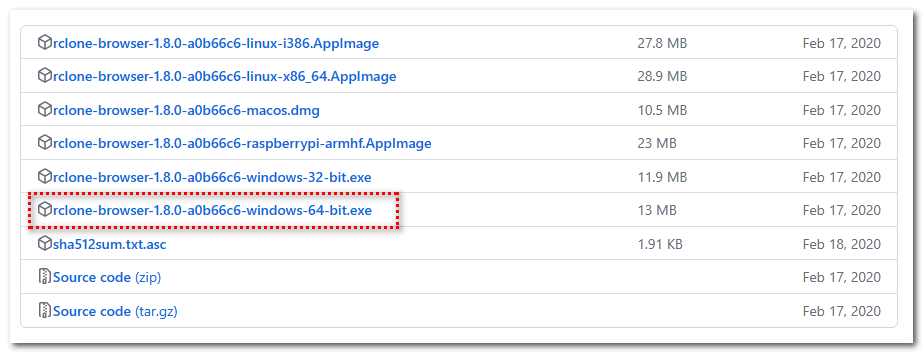
Download Rclone Browser Software: It is an open-source GUI (Graphical User Interface) tool based on Rclone, designed for managing and operating multiple cloud storage services. Using it, you can easily manage and sync data across cloud storage. The download link is: https://github.com/kapitainsky/RcloneBrowser/releases
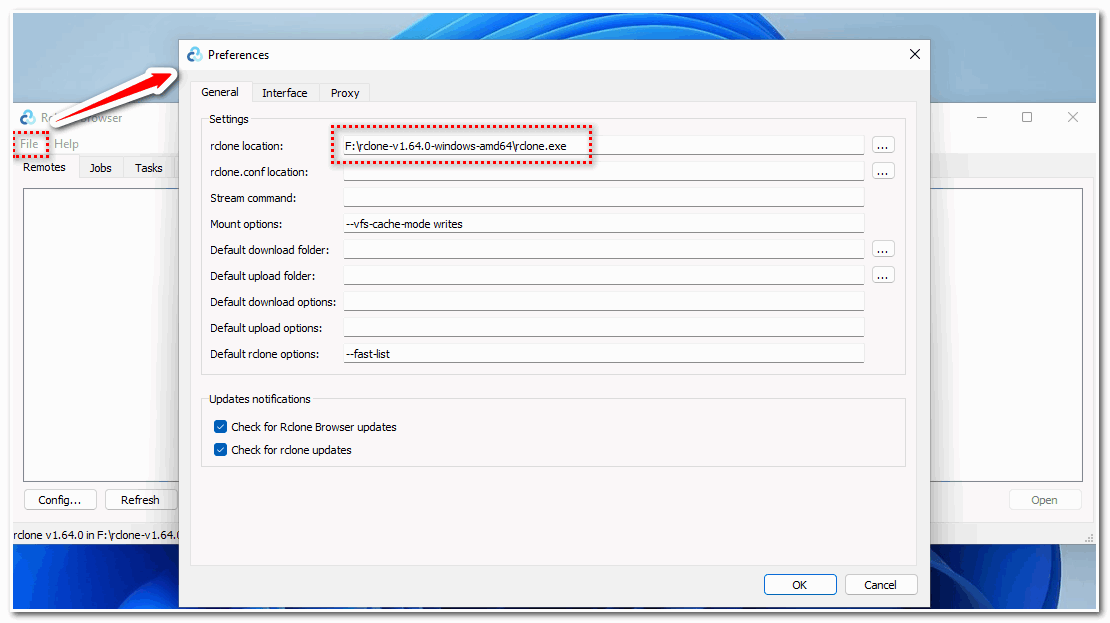
Configure Rclone Browser: Run the installed Rclone Browser and open the settings interface (File -> Preferences). In the Rclone location input box, click the button with three dots on the right, browse to the extracted rclone.exe file, and then click OK to save.
Configure Dropbox in Rclone Browser:
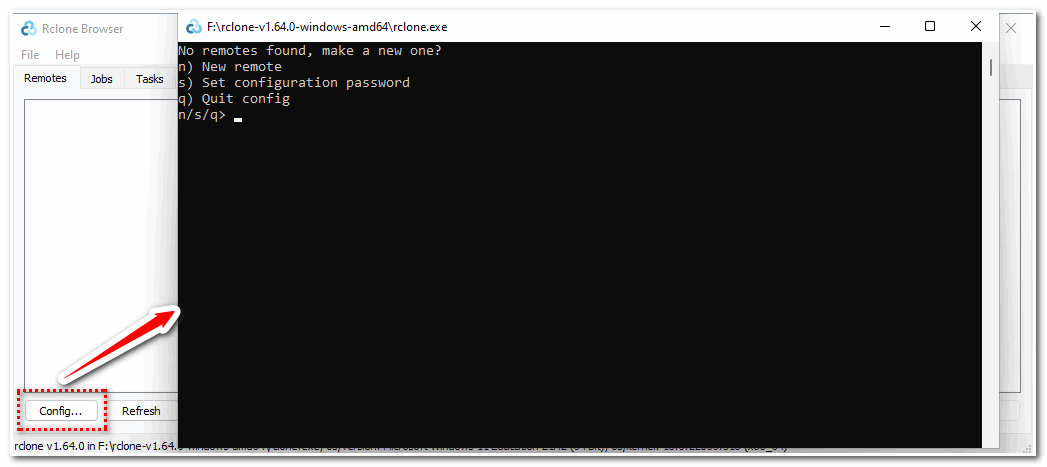
Click the Config button at the bottom of the Remote page to open the Rclone command-line window.
In the CMD, type "n" and press Enter to create a new configuration.Then, give the configuration a name. Here, I will name it "Dropbox" and press Enter to confirm.
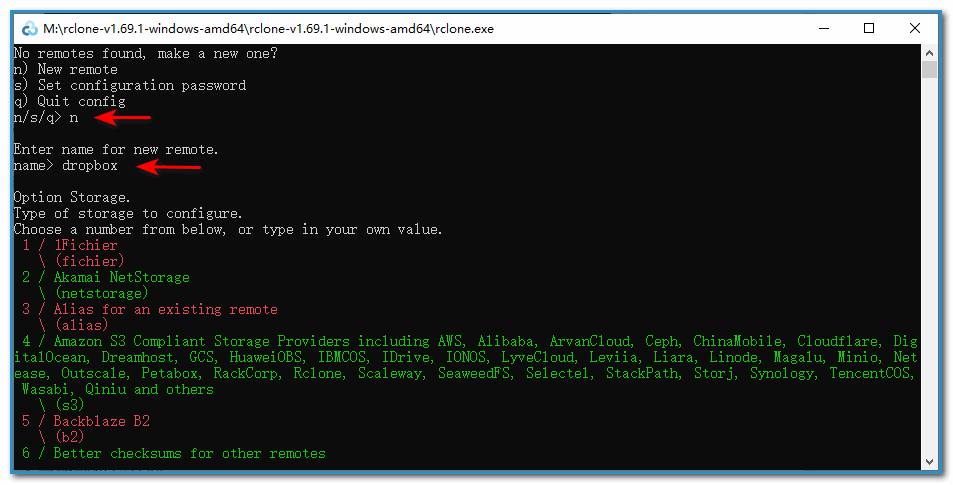
Next, select the configuration type. Here, choose the Dropbox type, which is numbered 13. Type 13 and press Enter to confirm.

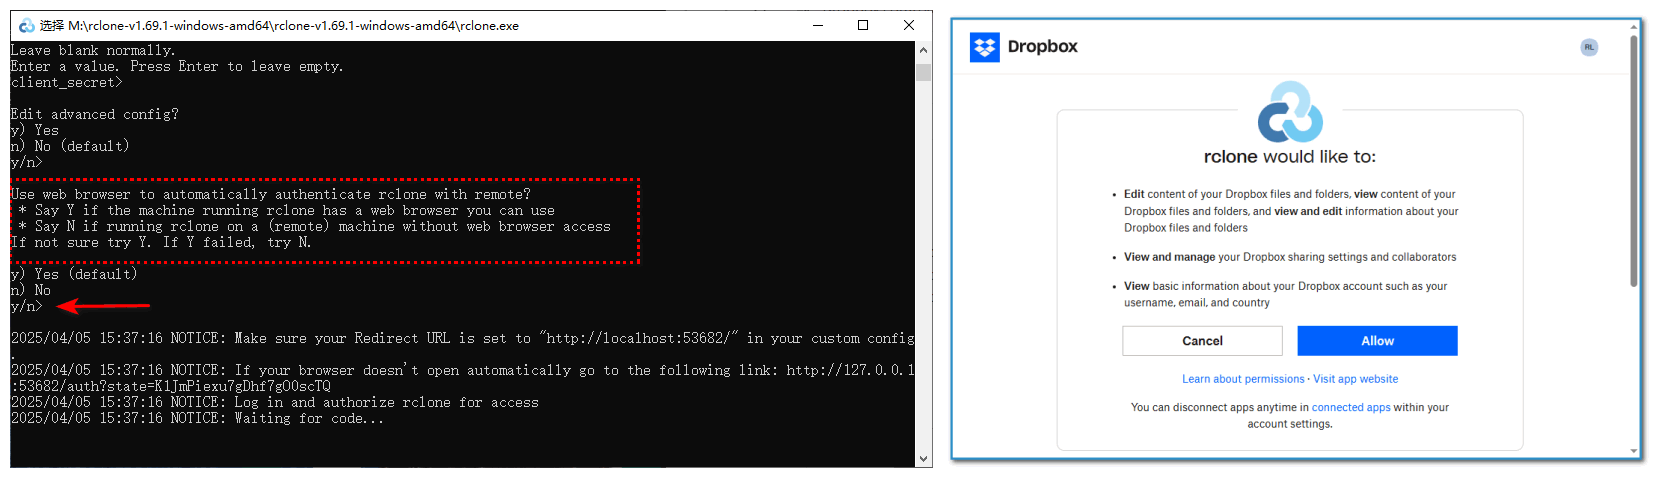
Then, press Enter to skip the client_id, client_secret, and Edit advanced config options.

When prompted with Use web browser to automatically authenticate rclone with remote?, press Enter. This will open the Dropbox authorization page, where you can click the Allow button to grant permission.
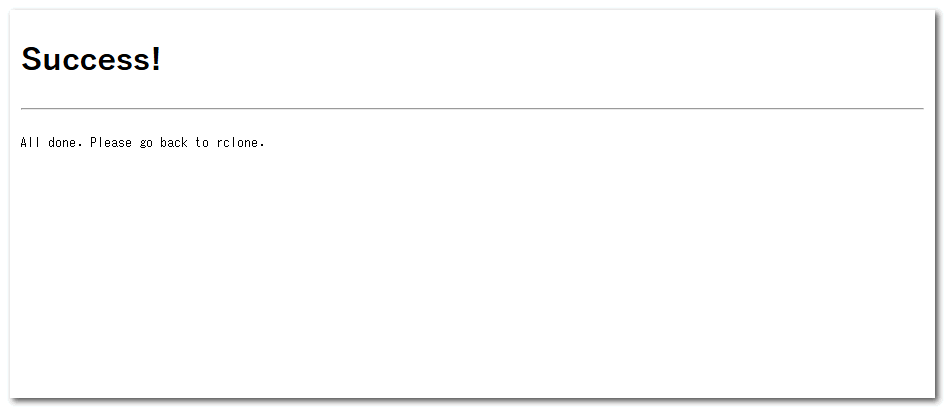
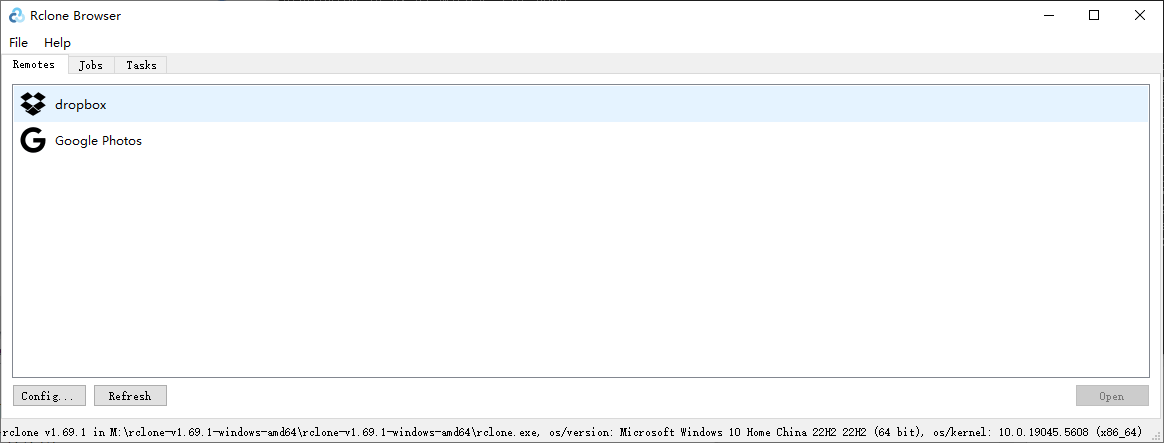
After seeing the success message on the web page, return to the Rclone Browser interface and click the Refresh button. You will then see that Dropbox has been successfully added.

Configure Google Photos Cloud Storage in Rclone Browser
The process of configuring Google Photos is similar to configuring Dropbox, but be careful not to select the wrong cloud storage type.In the authorization page, make sure to check the checkbox and click the Continue button to grant Rclone access to your Google account.
Once Google Photos is configured, you can click the Refresh button in Rclone Browser to check the setup.
Create a Transfer Task from Dropbox to Google Photos in Rclone Browser
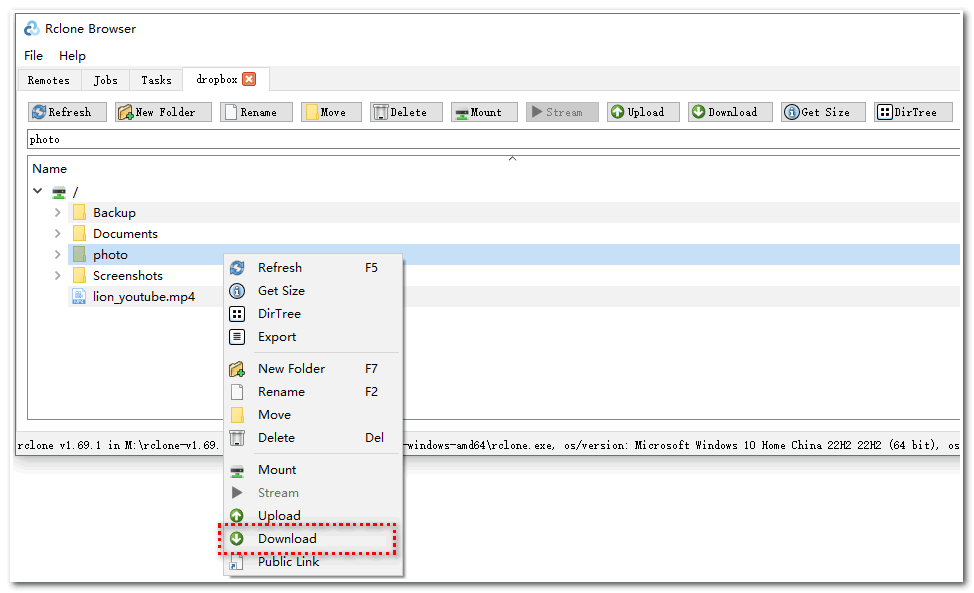
In the Remotes interface, double-click on Dropbox to open it. Once inside Dropbox, right-click on the album folder you want to transfer and click the Download button.
In the Target Path input box, enter the folder path in Google Photos, using the format Google Photos:folder. Here, I’m entering the album folder under Google Photos. Next, create a new test album, provide a task description, and click the Save Task button for easy incremental transfers next time.
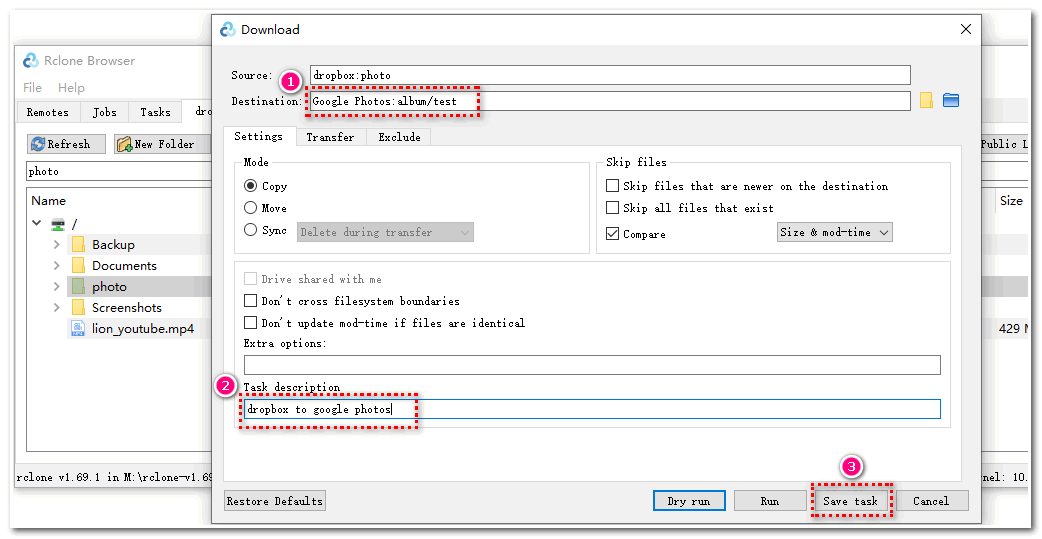
Go to the Tasks page and click the Run button to execute the task.
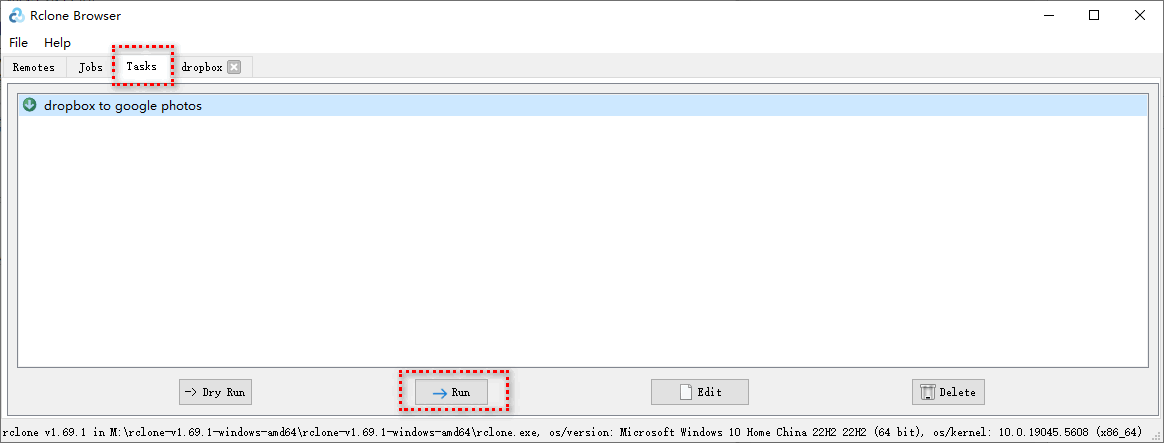
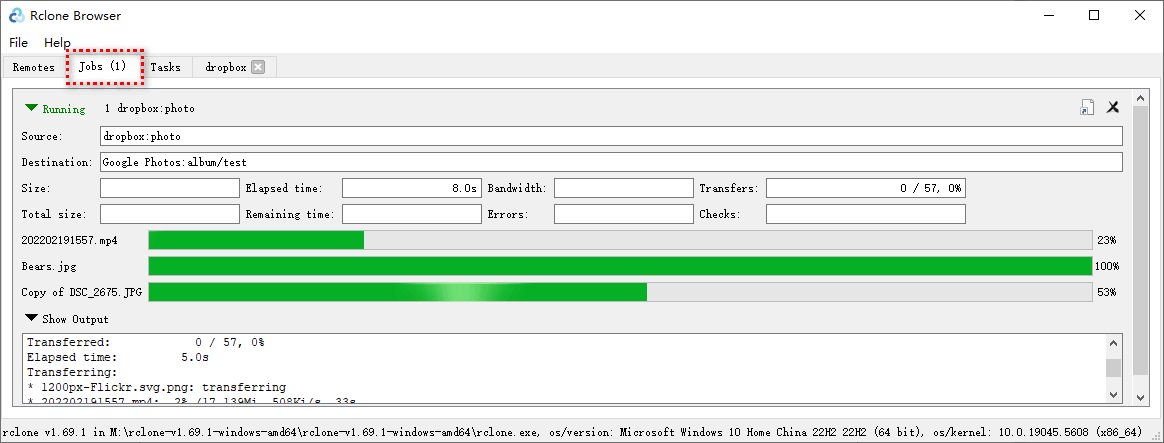
In the Jobs interface, the task will start executing. Wait for the task to complete successfully.
Advantages:
Completely free, no paid subscriptions required.
Open-source and secure, users can use it with confidence.
Supports dozens of mainstream cloud storage services.
Supports advanced features like resume from breakpoint, incremental synchronization, and high-speed transfers.
Cross-platform support (although this example is for Windows, Rclone also supports macOS and Linux).
Disadvantages:
The interface is command-line-based, with a higher learning curve.
Beginners may take time to get started and may need to consult documentation or tutorials for configuration.
Error messages are technical, making troubleshooting more difficult for newcomers.
In conclusion
In conclusion, among the four methods for transferring albums from Dropbox to Google Photos—manual download and upload, RiceDrive, Rclone, and the mobile version of RiceDrive—each has its applicable scenario. However, RiceDrive stands out clearly due to its efficiency, convenience, and user-friendly features. Whether through the desktop or mobile version, RiceDrive offers a smoother user experience and higher transfer efficiency, reducing the tedious steps of manual intervention while ensuring data security and integrity. In contrast, manual download and upload is time-consuming, Rclone is powerful but requires higher technical skills, and the mobile version of RiceDrive further lowers the operational threshold, making it ideal for users who need quick transfers. Therefore, for most users, RiceDrive is the best choice for seamless connection between Dropbox and Google Photos.